
In this tutorial, you’ll learn how to build a REST API using Express.js. Express.js is a lightweight and flexible web framework for Node.js. It’s popular for creating APIs quickly and efficiently. By the end, you’ll have a working API and understand the basics of how it works.
What is a REST API?
A REST API allows applications to communicate over the web. REST stands for Representational State Transfer. It follows simple principles:
- Stateless: Each request stands alone. No server memory is used for past requests.
- Client-Server: The client (browser or app) and server stay independent.
- Resource-Based: Each URL represents a resource (e.g.,
/users).
REST APIs are widely used because they are easy to understand and work with.
Why Use Express.js for REST APIs?
Express.js makes building REST APIs easier.
- Simple: It’s minimal, so you use only what you need.
- Flexible: You can add middleware to handle tasks like logging or parsing data.
- Fast: With fewer features baked in, it runs efficiently.
Developers often pick Express.js because it’s great for small and large projects alike.
Setting Up Your Development Environment
Prerequisites
Before starting, make sure you have:
- Node.js installed: Download it from Node.js official site.
- Basic JavaScript knowledge: Understand functions, objects, and ES6 syntax.
Installing Express.js
- Open a terminal.
- Run
npm install expressto add Express.js to your project.
Project Structure
Organize your project files as shown:
project-folder/
  ├── node_modules/
  ├── package.json
  ├── app.js
The app.js file will hold the API code.
Building Your First REST API
- Initialize Your Project
Run npm init -y in your terminal. This creates a package.json file.
- Create a Basic Server
Add the following code in app.js:
const express = require('express');
const app = express();
const PORT = 3000;

app.listen(PORT, () => console.log(`Server running on http://localhost:${PORT}`));
- Add Routes
Add API endpoints for different HTTP methods:
app.get('/users', (req, res) => res.json({ message: 'Get all users' }));
app.post('/users', (req, res) => res.json({ message: 'Create a user' }));
app.put('/users/:id', (req, res) => res.json({ message: `Update user ${req.params.id}` }));
app.delete('/users/:id', (req, res) => res.json({ message: `Delete user ${req.params.id}` }));
- Use Middleware
Middleware processes requests before they reach your routes. Add this to handle JSON data:
app.use(express.json());
Connecting to a Database
For this tutorial, we will use MongoDB. Install the library with:
npm install mongoose
Then connect to a MongoDB database:
const mongoose = require('mongoose');
mongoose.connect('mongodb://localhost:27017/mydatabase', { useNewUrlParser: true, useUnifiedTopology: true });
Testing Your API
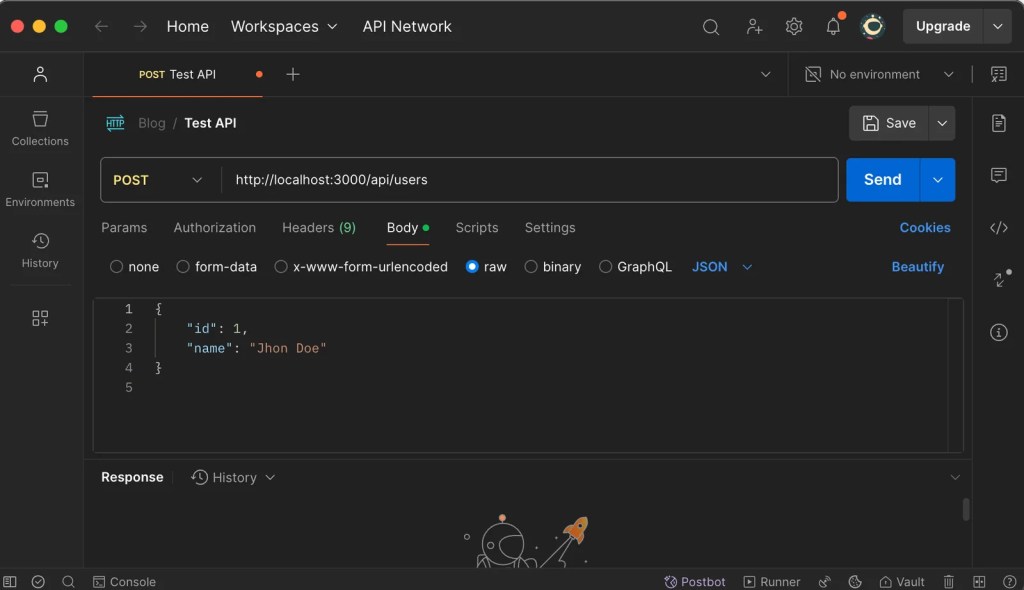
- Use Postman
Postman is a tool to test APIs. Download it from Postman’s website.
- Create a new request.
- Enter your API URL (e.g.,
http://localhost:3000/users). - Send requests to test endpoints.
- Automated Tests
Write tests with a library like Jest. Example:
test('GET /users', async () => {
  const response = await request(app).get('/users');
  expect(response.statusCode).toBe(200);
});
Best Practices for REST APIs
Follow these tips to make your API better:
- Use clear endpoint names: Stick to nouns like
/usersor/products. - Handle errors: Send meaningful messages for errors.
- Secure your API: Use tools like JSON Web Tokens (JWT) for authentication.
- Optimize responses: Cache data or paginate large results.
Common Challenges
- Debugging routes: Double-check your URLs and methods.
- Managing middleware: Keep it simple. Too many layers slow down performance.
- Scaling: Add a load balancer for heavy traffic.
Conclusion
You’ve built a REST API using Express.js. You learned about routes, middleware, and testing. Explore more by adding features like user authentication or deploying your API. Share your feedback in the comments or try building your own project!
Previous Lesson
Day 25: Introduction to Express.js
Next Lesson
Day 27: Connecting Node.js to a Database
Pingback: Express.js - Equitem
Pingback: Connect Node.js to a Database - Equitem
Thanks for helping out, good information.
I’m truly enjoying the design and layout of your site. It’s a very easy on the eyes which makes it much more enjoyable for me to come here and visit more often. Did you hire out a designer to create your theme? Exceptional work!
Well I definitely enjoyed reading it. This information provided by you is very constructive for good planning.
Hey, you used to write excellent, but the last few posts have been kinda boring… I miss your great writings. Past few posts are just a bit out of track! come on!
Thank you for sharing excellent informations. Your web site is so cool. I’m impressed by the details that you’ve on this blog. It reveals how nicely you perceive this subject. Bookmarked this web page, will come back for more articles. You, my pal, ROCK! I found simply the information I already searched all over the place and just could not come across. What an ideal website.
Hi there! I’m at work browsing your blog from my new apple iphone! Just wanted to say I love reading your blog and look forward to all your posts! Carry on the superb work!
Hmm is anyone else having problems with the pictures on this blog loading? I’m trying to find out if its a problem on my end or if it’s the blog. Any responses would be greatly appreciated.
Thanks for sharing superb informations. Your site is so cool. I am impressed by the details that you have on this blog. It reveals how nicely you understand this subject. Bookmarked this website page, will come back for more articles. You, my pal, ROCK! I found just the info I already searched all over the place and simply couldn’t come across. What an ideal web site.
As I website owner I think the written content here is real excellent, thankyou for your efforts.
Thank you for sharing superb informations. Your web-site is very cool. I am impressed by the details that you have on this site. It reveals how nicely you perceive this subject. Bookmarked this web page, will come back for more articles. You, my pal, ROCK! I found simply the information I already searched everywhere and simply couldn’t come across. What a perfect web-site.
I used to be very pleased to search out this web-site.I wanted to thanks for your time for this glorious read!! I definitely enjoying every little little bit of it and I’ve you bookmarked to take a look at new stuff you weblog post.
After I originally commented I clicked the -Notify me when new feedback are added- checkbox and now each time a remark is added I get 4 emails with the same comment. Is there any approach you can remove me from that service? Thanks!
Great write-up, I?¦m regular visitor of one?¦s web site, maintain up the nice operate, and It’s going to be a regular visitor for a long time.
Hello my loved one! I wish to say that this article is amazing, nice written and include almost all significant infos. I would like to peer more posts like this .
Some genuinely good information, Sword lily I noticed this.
Spot on with this write-up, I actually suppose this web site wants far more consideration. I’ll probably be again to learn far more, thanks for that info.
I wanted to thank you for this great read!! I definitely enjoying every little bit of it I have you bookmarked to check out new stuff you post…
F*ckin’ amazing things here. I’m very glad to see your article. Thanks a lot and i’m looking forward to contact you. Will you please drop me a e-mail?
I have been reading out some of your stories and it’s nice stuff. I will make sure to bookmark your website.
I am not very great with English but I find this real leisurely to interpret.
Thanks for another informative site. Where else could I get that type of info written in such a perfect way? I’ve a project that I’m just now working on, and I have been on the look out for such info.
What i don’t realize is actually how you are not actually much more well-liked than you may be now. You’re so intelligent. You realize thus significantly relating to this subject, produced me personally consider it from numerous varied angles. Its like women and men aren’t fascinated unless it is one thing to accomplish with Lady gaga! Your own stuffs great. Always maintain it up!
I do agree with all of the ideas you have presented in your post. They’re really convincing and will definitely work. Still, the posts are very short for beginners. Could you please extend them a bit from next time? Thanks for the post.
I will immediately clutch your rss feed as I can’t find your email subscription link or e-newsletter service. Do you’ve any? Kindly let me understand so that I may subscribe. Thanks.
My partner and I absolutely love your blog and find nearly all of your post’s to be precisely what I’m looking for. Would you offer guest writers to write content for you? I wouldn’t mind publishing a post or elaborating on many of the subjects you write regarding here. Again, awesome web site!
I was very pleased to find this web-site.I wanted to thanks for your time for this wonderful read!! I definitely enjoying every little bit of it and I have you bookmarked to check out new stuff you blog post.
Glad to be one of the visitors on this awing site : D.
I love it when people come together and share opinions, great blog, keep it up.
Terrific work! This is the type of info that should be shared around the net. Shame on Google for not positioning this post higher! Come on over and visit my website . Thanks =)
Hello there! Do you know if they make any plugins to safeguard against hackers? I’m kinda paranoid about losing everything I’ve worked hard on. Any tips?
My husband and i have been happy Ervin could deal with his research out of the ideas he discovered while using the web page. It’s not at all simplistic to simply happen to be making a gift of key points that many many others could have been selling. Therefore we realize we now have you to give thanks to for that. The most important illustrations you made, the straightforward web site navigation, the friendships you will assist to promote – it’s all astounding, and it is making our son in addition to the family reckon that the topic is cool, and that is quite vital. Thanks for everything!
Hi, i think that i saw you visited my website so i came to “return the favor”.I’m trying to find things to enhance my web site!I suppose its ok to use a few of your ideas!!
Hi, i feel that i noticed you visited my web site so i came to “return the want”.I’m attempting to in finding things to improve my web site!I guess its ok to use a few of your ideas!!
Great tremendous issues here. I?¦m very glad to look your post. Thanks a lot and i am taking a look ahead to touch you. Will you kindly drop me a mail?
I like this web site very much, Its a rattling nice office to read and obtain info .
Hi this is kind of of off topic but I was wanting to know if blogs use WYSIWYG editors or if you have to manually code with HTML. I’m starting a blog soon but have no coding experience so I wanted to get guidance from someone with experience. Any help would be enormously appreciated!
I really glad to find this web site on bing, just what I was looking for : D as well bookmarked.
Hi there, I found your site by way of Google even as looking for a related matter, your web site got here up, it appears great. I have bookmarked it in my google bookmarks.
Its like you read my mind! You seem to know a lot about this, like you wrote the book in it or something. I think that you could do with some pics to drive the message home a bit, but other than that, this is great blog. An excellent read. I’ll definitely be back.
Hello, i read your blog from time to time and i own a similar one and i was just wondering if you get a lot of spam feedback? If so how do you reduce it, any plugin or anything you can advise? I get so much lately it’s driving me crazy so any assistance is very much appreciated.
Wow! Thank you! I constantly needed to write on my blog something like that. Can I include a portion of your post to my site?
I like this site so much, saved to my bookmarks. “To hold a pen is to be at war.” by Francois Marie Arouet Voltaire.
Hey! Do you use Twitter? I’d like to follow you if that would be okay. I’m absolutely enjoying your blog and look forward to new posts.
Absolutely indited subject material, Really enjoyed looking at.
It’s actually a cool and helpful piece of info. I am glad that you shared this useful info with us. Please keep us informed like this. Thanks for sharing.
hey there and thank you for your information – I’ve definitely picked up anything new from right here. I did however expertise some technical issues using this site, since I experienced to reload the web site lots of times previous to I could get it to load correctly. I had been wondering if your web host is OK? Not that I am complaining, but slow loading instances times will very frequently affect your placement in google and could damage your high quality score if advertising and marketing with Adwords. Anyway I’m adding this RSS to my e-mail and can look out for much more of your respective exciting content. Ensure that you update this again soon..
I like what you guys are up also. Such clever work and reporting! Carry on the excellent works guys I’ve incorporated you guys to my blogroll. I think it’ll improve the value of my web site 🙂
Good write-up, I’m regular visitor of one’s web site, maintain up the nice operate, and It’s going to be a regular visitor for a lengthy time.
This web site is my aspiration, very good design and style and perfect subject material.
My partner and I stumbled over here from a different web address and thought I may as well check things out. I like what I see so i am just following you. Look forward to looking over your web page for a second time.
Hello There. I found your blog using msn. This is an extremely well written article. I’ll be sure to bookmark it and return to read more of your useful info. Thanks for the post. I will definitely comeback.
Hello my family member! I want to say that this article is awesome, great written and come with approximately all important infos. I would like to peer extra posts like this .
Do you have a spam problem on this site; I also am a blogger, and I was wanting to know your situation; we have developed some nice practices and we are looking to trade solutions with others, why not shoot me an email if interested.
At this time it seems like WordPress is the top blogging platform available right now. (from what I’ve read) Is that what you are using on your blog?
Greetings from Idaho! I’m bored to tears at work so I decided to check out your website on my iphone during lunch break. I love the information you provide here and can’t wait to take a look when I get home. I’m shocked at how fast your blog loaded on my cell phone .. I’m not even using WIFI, just 3G .. Anyways, fantastic site!
Just desire to say your article is as astonishing. The clarity to your put up is just spectacular and that i could think you’re knowledgeable on this subject. Fine together with your permission allow me to clutch your RSS feed to keep updated with drawing close post. Thank you a million and please continue the enjoyable work.
of course like your web site however you have to check the spelling on quite a few of your posts. A number of them are rife with spelling issues and I to find it very bothersome to tell the reality then again I will definitely come again again.
Pretty component of content. I simply stumbled upon your weblog and in accession capital to assert that I acquire actually loved account your weblog posts. Anyway I’ll be subscribing for your feeds and even I success you get entry to consistently fast.
wonderful post.Never knew this, appreciate it for letting me know.
I would like to thnkx for the efforts you have put in writing this blog. I am hoping the same high-grade blog post from you in the upcoming as well. In fact your creative writing abilities has inspired me to get my own blog now. Really the blogging is spreading its wings quickly. Your write up is a good example of it.
Very nice post. I just stumbled upon your weblog and wished to say that I have truly enjoyed browsing your blog posts. In any case I’ll be subscribing to your feed and I hope you write again soon!
I was very pleased to find this web-site.I wanted to thanks for your time for this wonderful read!! I definitely enjoying every little bit of it and I have you bookmarked to check out new stuff you blog post.
I’m really enjoying the design and layout of your blog. It’s a very easy on the eyes which makes it much more pleasant for me to come here and visit more often. Did you hire out a designer to create your theme? Great work!
of course like your website but you need to check the spelling on several of your posts. A number of them are rife with spelling issues and I find it very bothersome to tell the truth nevertheless I will surely come back again.
Terrific paintings! This is the kind of info that are meant to be shared across the net. Shame on Google for now not positioning this put up upper! Come on over and visit my site . Thank you =)
You could certainly see your enthusiasm in the work you write. The world hopes for more passionate writers like you who aren’t afraid to say how they believe. Always follow your heart.
It’s a shame you don’t have a donate button! I’d without a doubt donate to this fantastic blog! I guess for now i’ll settle for bookmarking and adding your RSS feed to my Google account. I look forward to brand new updates and will talk about this blog with my Facebook group. Chat soon!
I was suggested this blog by my cousin. I’m not certain whether this post is written through him as no one else understand such targeted about my difficulty. You’re wonderful! Thank you!
Very interesting details you have remarked, regards for putting up. “A big man is one who makes us feel bigger when we are with him.” by John C. Maxwell.
I like what you guys are up too. Such clever work and reporting! Carry on the excellent works guys I have incorporated you guys to my blogroll. I think it’ll improve the value of my site 🙂
Wow! Thank you! I permanently needed to write on my blog something like that. Can I implement a fragment of your post to my site?
I would like to show my passion for your kindness giving support to men and women that actually need assistance with this particular situation. Your personal commitment to passing the solution across had become especially productive and have really enabled girls like me to reach their objectives. Your own valuable tips and hints signifies a lot to me and much more to my office workers. Thanks a ton; from each one of us.
You are my breathing in, I have few blogs and rarely run out from to post .
Hey there! I know this is somewhat off topic but I was wondering if you knew where I could get a captcha plugin for my comment form? I’m using the same blog platform as yours and I’m having trouble finding one? Thanks a lot!
Do you mind if I quote a few of your articles as long as I provide credit and sources back to your website? My website is in the exact same niche as yours and my visitors would truly benefit from some of the information you present here. Please let me know if this alright with you. Thanks a lot!
Hello! I just would like to give a huge thumbs up for the great info you have here on this post. I will be coming back to your blog for more soon.